Jira
You can send your Flare alerts directly to Jira. Here's how to configure Flare and receive data in your Jira Workspace. For detailed instructions, follow the storylane demo provided below.
Creating a Jira Alert Channel
You will need to be have an ADMIN role in your Flare organization in order to configure this Integration
Go to the Integration Hub.
Click on Configure then Channel to create a new Channel.
Enter a name for your Channel.

Select "Jira" as Type.

Fill in the following information
- Server netloc: the full domain of your jira server. Ex: my-company.atlassian.net
- Email: The email of the account associated with the API token.
- API Token: The API token (Create the API token here: https://id.atlassian.com/manage-profile/security/api-tokens)
- Space Key: The project key is usually an UPPERCASE version of your project name. It can be found in the url of your project.
- Work Type: The value provided should be an exact match with what was created in Jira.
- Labels: These labels are added to every created issue. The labels support Formatting (see below).

Optionally, you can add additional custom fields to pass to Jira when creating issues. Each entry takes a field key and a value. Multiple fields can be added using the Add field button. This setting enables support for Jira Service Management. For more information, see Jira Service ManagementAdding Custom Jira Fields..
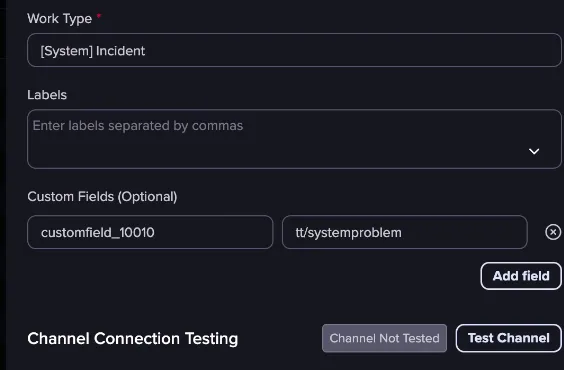
Use the Test Channel button to ensure that the connection is successful.
After a successful test, click the Create Alert Channel button to create the Channel.
Formatting
Dynamic formatting is supported for the following activity fields:
- risk
- source
- type
Currently, formatting can only be used in the labels. For example, a label value of flare-${risk} can result in labels such as flare-high, flare-critical, etc.

Viewing Alerts in Jira
Here is what a resulting Flare alert will look like in Jira. This example is from a Telegram chat message

Jira Service Management
Flare supports Jira Service Management (JSM) Alert Channels. JSM requires a request type to be set when creating issues, which is configured using the Custom Fields option when setting up the Channel.
Each Custom Fields entry takes a field key and a value. For JSM, the field key is the custom field ID that corresponds to request type in Jira.
Follow these steps to find the correct values for your instance:
Find the custom field ID
- Go to the following URL, replacing <work-item-id> with the ID of any existing issue in your project: https://<your-domain>.atlassian.net/rest/api/3/issue/<work-item-id>?expand=names
- In the response, extract the customfield_XXXXX key from fields.issuetype.name where the value is Request Type.
- Also note the `id` value of the issue, which you will need for the next step.
Find the portal key and request type key
- Go to the following URL, replacing <issue-numerical-id> with the `id` value from Step 1 above: https://<your-domain>.atlassian.net/rest/servicedesk/1/servicedesk/request/<issue-numerical-id>/request-types
- Extract the portalKey and key from the request type you would like to use with Flare.
- Combine them as <portalKey>/<key> and enter those values as Custom Fields in the Jira Alert Channel.
For more detail on these API calls, see Set the Request Type when creating an issue using REST API in JSM Cloud in the Atlassian support documentation.